
If a misguided doorknob or an impromptu hockey game has left your wall with a large hole, you may think it’s time to call in Drywall Repair Las Vegas. But with a little patience and some joint compound, even the most novice DIYer can make a near-invisible repair.
Start by cutting a piece of drywall to match the size of the damaged area. Be sure to check for electrical wires or plumbing pipes before you proceed.
If you notice a crack in your wall, it’s important to fix it as soon as possible. Not only does this prevent further damage to the drywall, but it can also help reduce stress on the entire structure of your home. Whether the crack is caused by the shifting of your building on its foundation, changes in weather, or simply because of age, you can usually repair it in a couple of steps and have it ready to paint in a day or so.
If the crack in your wall is a long, continuous line, you’ll want to scrape along its entire length with a stiff putty knife to remove all the paint, texture, and drywall mud until you reach the bare drywall paper. Once the area is clean, you can use a tube of paintable caulk to fill in the crack. Follow the manufacturer’s instructions for applying the caulk and letting it cure according to the label.
For cracks that aren’t as long, you can cover them with a thin coat of drywall compound. First, apply a layer of the compound with a 4- to 6-inch taping knife, smooth it out, and push it into the crack with the blade. If necessary, apply a second and third layer of the compound, with each one being thinner than the last. Lightly sand each coat to create a smooth surface and allow it to dry thoroughly.
Cracks that are caused by the shifting of your house on its foundation can be more difficult to repair than those caused by changes in weather. These cracks often appear on the corners of doors and windows, as they are most sensitive to movement in these areas. They can also develop where the foundation is leaking or where the building is resting on fill dirt rather than solid rock.
If you notice a lot of these cracks in your walls, it’s probably a good idea to have your house inspected by a professional to see if the cracking is related to a more serious problem, such as a foundation issue or seismic movement.
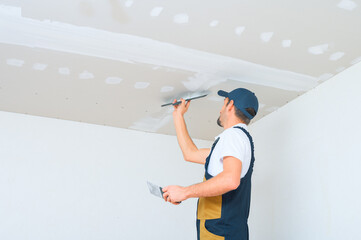
Holes
Whether caused by a doorknob or a power drill, holes are one of the most common types of drywall damage. Luckily, they’re also among the easiest to repair. If the hole is small, a simple spackle or lightweight joint compound may be enough to make it look smooth and seamless. However, larger holes will require something stronger and sturdier. Depending on how much damage the hole has sustained, you can either cover it with another sheet of drywall or bridge the gap with a bridging material.
Regardless of size, always sand the area surrounding the hole before starting to ensure it’s smooth and free of any rough spots. Once the sanding is complete, clean the area and remove any chipped paint or debris. Once again, square off the hole if it’s round or irregular in shape, using a utility knife to transform it into a rectangle. This will help ensure the drywall patch you create fits correctly.
To begin the actual repair process, cut a piece of drywall to roughly double the size of the existing hole. Once you’ve got the right piece, line it up with your squared-off hole and trace around it on the backside of the drywall with a sharp utility knife. This will help you create a shape to fit perfectly into the hole, says Steckel. Carefully cut along these lines, making sure you don’t cut through the front paper. Then, snap off any extra pieces but leave the front paper attached to the drywall patch.
Once you’ve got the correct shape to fill the hole, screw it into place. Then, attach strips of drywall tape to the edges of the patch and wall, as well as any joints between the drywall patch and the surrounding drywall. Finally, spread a coat of drywall compound over the entire surface of the bridging material, letting it dry per the manufacturer’s instructions.
For holes smaller than about 2 inches in diameter, a drywall patch kit will work just fine, Nungesser explains. A kit will usually include a self-adhering fiberglass mesh patch, which will simply stick to the wall and hide the gap. For holes larger than this, he recommends removing the studs if they’re visible (and then covering them with a new piece of drywall) or, alternatively, covering the hole with a large sheet of drywall.
Sagging
Sagging drywall can ruin the look of a room and create a dangerous hazard. It also indicates that it’s time to do some drywall repair work.
Drywall is made of thin paper and gypsum, which can crumble or even break when subjected to force. Furniture, heavy appliances, strong winds, and changes in humidity can all cause cracks and other damage to drywall. Left untreated, such damage can exacerbate and lead to much larger and more expensive repair jobs down the line.
One common problem that can occur in drywall is called “sagging,” when a section of the ceiling starts to droop and leaves noticeable shadow lines on the wall behind it. Often, sagging is caused by a leak in the roof or water pipes, although it can also be a result of improper installation, as noted by Confide Construction.
Incorrect spacing of screws can contribute to sagging, too. Usually, 4” screws should be spaced 12” apart to provide adequate support for the drywall. But sometimes installers will play this rule a little loosely to save time and money, which can make the drywall more vulnerable to shifting over time with changes in moisture levels and temperature fluctuations.
Another reason sagging may occur is when the original installation used only 1/2″ drywall rather than 5/8″. While this thickness is cheaper and easier to hang, it doesn’t provide as much rigidity and is more susceptible to sagging.
To fix a sagging ceiling, locate the joists, which can be seen as valleys between the drywall, notes Family Handyman. Screw 1-by-3-inch furring strips to the joist framing using 2-inch wood screws. Then, install, tape, and finish new 5/8-inch drywall over the old ceiling, screwing it to the furring strips with drywall screws. When the new drywall is in place, use a level to ensure that it’s flat. Then sand it down so that the seams are smooth, and you’re ready for paint. A few coats of quality drywall compound can hide any remaining patches or sagging in the drywall. Just remember to sand between coats so that the seams aren’t visible.
Mold
Moisture damage is one of the most common problems affecting drywall. Humidity and a lack of ventilation in bathrooms, basements, and laundry rooms trap moisture, which can cause drywall to become damp and eventually start growing mold. Other signs of mold in drywall include discolored water stains, bubbling or peeling paint, and musty odors. If you suspect mold in your drywall, it’s important to act fast. Otherwise, the spores may spread to other areas of the house and cause more damage and health issues.
If you’re not sure whether or not the mold is dangerous, use a test kit to find out. Some molds, especially those that grow on drywall, can produce toxins that can be harmful to children, the elderly, or people with allergies. You should also wear a dust mask and safety goggles while removing mold from drywall.
After removing the mold, wash the area with an antibacterial cleaner to prevent further growth and kill any remaining spores. A box fan and a window should be open to help with ventilation during this step. Next, sand the area with a hand sander to smooth it, and fill in any holes or voids with drywall joint compound or mud. Wait for the mud to dry and sand again until it is smooth (images 2 and 3).
Once the mud is dry, use a self-adhering mesh patch to cover the hole, or, if you can see the studs through the hole, cut a piece of new drywall that’s an identical size as the old one and screw it in place (Image 4). Apply a coat of fungicidal mold-killing primer, like this product from Zinsser, over the patch to prevent the spores from reforming.
Once the repair has been completed, use a utility knife to cut off the excess drywall around the perimeter of the affected area and throw away the pieces that have mold on them. If there is a lot of mold on the wood behind the drywall, you may need to hire a professional to treat the entire area.